
Google Tag Manager setup is the process of creating an account and container, installing two code snippets on your website, and configuring tags and triggers through a web dashboard to control tracking without touching your site's code directly. GTM gives marketing professionals and small business owners the ability to deploy scripts independently, cutting tag deployment time from days to minutes. The entire process takes roughly 10 minutes with proper admin access. That speed matters because every day without accurate tracking is a day of decisions made on incomplete data.
What do you need before starting your Google Tag Manager setup?
The right preparation prevents the most common GTM mistakes before they happen. You need three things in place before you touch tagmanager.google.com.
Accounts and access you must have:
- A Google account connected to your business (not a personal Gmail if avoidable)
- Admin-level access to your website's CMS, theme files, or codebase
- A Google Analytics 4 property already created, so you have a Measurement ID ready
- A clear list of what you want to track: page views, form submissions, button clicks, or purchases
Tools that make verification easier:
- Google Tag Assistant (a Chrome browser extension) for real-time tag checking
- Chrome DevTools for inspecting page source code after installation
- Access to GA4 DebugView to confirm data receipt after tags fire
Container naming best practices:
Name your GTM container after your domain, not your business name. "yourdomain.com" is clearer than "My Business LLC" when you manage multiple properties later. GTM supports web, iOS, Android, and AMP containers. For most small business owners, the "Web" container type is the correct choice.
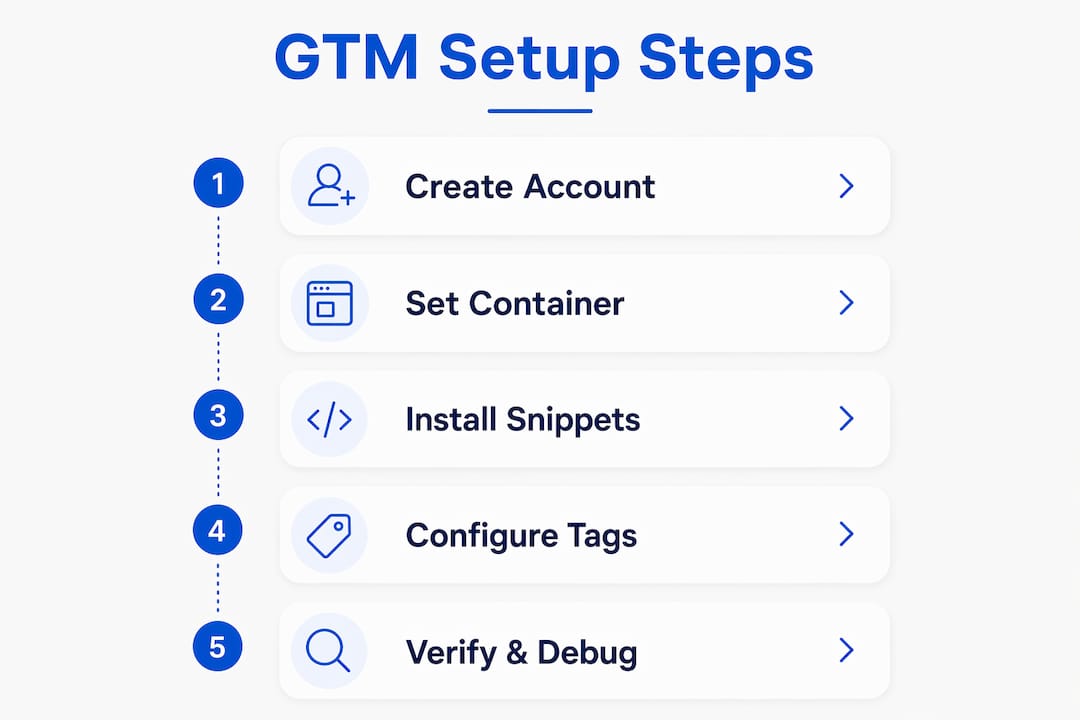
WordPress and Shopify both support GTM installation through theme editing or dedicated plugins. Custom HTML sites require direct code editing. Know which platform you are on before you start.

How to create your GTM account and container
The account creation process is straightforward. Follow these steps exactly to avoid setup errors.
- Go to tagmanager.google.com and sign in with your Google account.
- Click "Create Account." Enter your company name as the account name. Use your domain name as the container name.
- Select "Web" as the target platform. This generates the correct snippet format for standard websites.
- Click "Create" and accept Google's Terms of Service. Read the data processing terms if your site collects personal data from EU visitors, since GDPR compliance applies even for US businesses with international traffic.
- Copy both code snippets that appear immediately after account creation. GTM displays them only once before routing you to the dashboard, though you can retrieve them later under Admin > Install Google Tag Manager.
The account holds your billing and user permissions. The container holds your tags, triggers, and variables. One Google account can manage multiple containers across different websites. This structure matters if you run campaigns for multiple clients or own more than one business property.
How to install the GTM container code on your website
Correct snippet placement is the single most critical step in the entire GTM installation process. Getting this wrong causes missed or delayed tracking data.
- Place the first snippet (the
<script>tag) as high as possible in the<head>section of every page on your site. "As high as possible" means immediately after the opening<head>tag, before any other scripts. - Place the second snippet (the
<noscript>tag) immediately after the opening<body>tag. Do not place it in the footer. Footer placement causes the tag to fire late or not at all on fast-loading pages. - Verify both snippets appear on every page, including your homepage, blog posts, product pages, and thank-you pages.
Platform-specific installation tips
WordPress: Use a plugin that injects GTM into the <head> and <body> automatically. Confirm the plugin does not conflict with your theme's existing header scripts. After installing the plugin, view your page source and search for "GTM-" to confirm the container ID appears in both locations.
Shopify: Edit your theme's theme.liquid file directly. Paste the <script> snippet inside the <head> tags and the <noscript> snippet right after <body>. Shopify's theme editor makes this accessible without developer tools.
Custom HTML sites: Edit your base template or layout file. Every page must inherit from this file for GTM to fire site-wide.
Pro Tip: The noscript snippet provides fallback tracking for visitors with JavaScript disabled, preserving data from 1–3% of your traffic. Skipping it creates a small but permanent blind spot in your analytics.
The most damaging mistake is double installation. Duplicate GTM containers cause every tag to fire twice, inflating pageview counts and corrupting conversion data. This happens when a developer manually adds the snippet and a plugin also injects it. Check your page source for two instances of your GTM container ID and remove one immediately if you find them.
How do you configure your first tags in GTM?
GTM only delivers data you configure it to collect. Define your tracking strategy before creating a single tag. Know which events matter to your business before you open the tag editor.
Setting up a GA4 Configuration tag:
- In your GTM workspace, click "Tags" then "New."
- Select "Google Analytics: GA4 Configuration" as the tag type.
- Enter your GA4 Measurement ID (format: G-XXXXXXXXXX).
- Set the trigger to "All Pages" so GA4 receives data on every page load.
- Name the tag clearly: "GA4 Configuration" works fine.
- Click "Save."
Adding conversion tracking tags:
- Google Ads conversion tags require your Conversion ID and Conversion Label from your Google Ads account. Set these to fire on your thank-you page only, using a Page URL trigger that matches the confirmation URL.
- Meta Pixel tags use the same logic. Create a custom trigger that fires only when the URL contains "/thank-you" or "/order-confirmed."
Using the dataLayer for advanced tracking:
The dataLayer is a JavaScript array that passes structured data from your website to GTM. Developers push events into the dataLayer (such as form submissions or product clicks), and GTM reads those events to fire the right tags. This approach tracks complex user interactions far beyond basic page views.
Pro Tip: Keep your tag naming consistent from day one. A format like "GA4 Event: Form Submit" or "Google Ads: Purchase Conversion" makes audits far faster when your container grows to 30+ tags.
How do you verify and debug your GTM setup?
Verification is not optional. A tag that appears configured but fires incorrectly produces worse data than no tag at all.
Your debugging toolkit:
- GTM Preview Mode: Click "Preview" in your GTM workspace. Enter your website URL and GTM opens a debug panel overlay showing every tag that fires on each page interaction. A "Connected" status confirms your container is installed correctly.
- GA4 DebugView: In your GA4 property, go to Configure > DebugView. With Preview Mode active, your site sends real-time event data to DebugView. Confirm your GA4 Configuration tag appears there within seconds of loading a page.
- Chrome DevTools: Open the Network tab and filter by "collect" to see GA4 hits leaving your browser. This confirms data transmission at the network level.
- Google Tag Assistant: Install this Chrome extension and visit your site. It flags missing snippets, duplicate containers, and misconfigured tags with plain-language error descriptions.
Using GTM Preview Mode and GA4 DebugView together gives you two independent confirmation points: GTM confirms the tag fired, and GA4 confirms the data arrived. If GTM shows a tag firing but GA4 shows nothing, the problem is in your Measurement ID or tag configuration, not your installation.
Common errors to resolve immediately: a tag showing "Paused" status means it was manually paused in the workspace. A tag firing on the wrong pages means your trigger conditions are too broad. A "Tag Failed to Fire" error in Preview Mode usually points to a JavaScript conflict on the page.
Key Takeaways
A correct Google Tag Manager setup requires proper snippet placement, a clear tagging strategy, and active verification using Preview Mode and GA4 DebugView before publishing any container.
| Point | Details |
|---|---|
| Snippet placement is critical | Place the script in <head> and noscript after <body> on every page. |
| Avoid double installation | Two GTM snippets on one page inflate data and corrupt conversions. |
| Define your strategy first | GTM collects only what you configure; plan your tracked events before building tags. |
| Use Preview Mode to verify | GTM Preview Mode confirms tag firing in real time before you go live. |
| Audit your container regularly | Remove unused tags every 6 months to protect site speed and search rankings. |
What I've learned from watching marketers set up GTM wrong
Most GTM mistakes happen in the first 30 minutes. Marketers rush to get tags live and skip the verification step. They publish a container, assume everything works, and spend weeks making decisions on corrupted data before anyone notices.
The insight that changed how I approach GTM is this: the tool itself is neutral. GTM is a delivery mechanism, not a data source. The quality of your analytics depends entirely on the quality of your tagging strategy. A messy container with 40 untested tags produces worse insights than a clean container with five well-verified ones.
The other thing most guides skip is the performance cost. Unused tags slow your site in ways that compound over time. Every script that loads adds weight. A tag audit every six months is not a nice-to-have. It directly affects your page speed scores and, by extension, your search rankings.
GTM's real value for small business owners is independence. You can add a Meta Pixel, a Google Ads remarketing tag, or a LinkedIn Insight Tag without filing a ticket with a developer. That independence is worth protecting by keeping your container clean and your naming conventions consistent from day one.
— Dylan
Your website needs to be GTM-ready before tracking can work
GTM performs best on a website built with clean code, fast load times, and proper page structure. If your site has bloated themes, conflicting scripts, or no clear conversion paths, even a perfect GTM setup will underperform.
Forge-web-studio builds responsive websites for local businesses with tracking performance built into the foundation, not bolted on afterward. Every site Forge-web-studio delivers includes clean code structure that makes GTM installation straightforward and conflict-free. Texas businesses working with Forge-web-studio get sites designed for lead generation, mobile clarity, and local search visibility. If your current site is holding your analytics back, a conversation with Forge-web-studio is the right next step. Visit Forge-web-studio's web design services to see what a tracking-ready site looks like.
FAQ
What is Google Tag Manager and why do I need it?
Google Tag Manager is a free tag management system that lets you add and update tracking scripts on your website without editing code directly. It gives marketers control over analytics and conversion tracking without requiring developer support for every change.
How long does a GTM setup take?
The full GTM setup process takes approximately 10 minutes with admin access to your website. Configuring individual tags for GA4 and conversion tracking adds additional time depending on the number of events you track.
Where exactly do I place the GTM code snippets?
Place the <script> snippet as high as possible inside the <head> tag, and place the <noscript> snippet immediately after the opening <body> tag. Footer placement causes missed tracking data on fast-loading pages.
What causes duplicate data in Google Analytics after GTM setup?
Double installation of the GTM container is the most common cause. This happens when both a plugin and manual code inject the same container ID, causing every tag to fire twice and inflating all metrics.
Do I need a developer to set up Google Tag Manager?
No. GTM is designed for marketers to manage independently. You need one-time admin access to your website's code or CMS to install the two snippets, and after that, all tag management happens inside the GTM dashboard without touching your site's code.